Rigging Inshore Tackle for Tampa Fishing
-
Rod – 7.5 foot DAiwa Saltiga Spinning Rod – #761MFS – Medium Action
-
Reel – Shimano Symetre Series Spinning Reel #4000FJ
-
Backing – 20 lbs Ande Monofilament
-
Line – 20 lbs Power Pro – Moss Green
-
Leader – 30 lbs Ande Flourocarbon
-
Hook – Owner 2/ 0 Mutu Light Wire Circle Hook #5314-121
Many anglers spend countless hours trying to put themselves in front of the fish of a lifetime. As this is the case, it is imperative that you are equipped with the right tackle, rigged in the proper fashion. When fishing the inshore waters of the Tampa Bay Area, most fish don’t exceed twenty pounds so I would recommend the following tackle. Although the tackle suggested below will work for a broad range of species, you may also want to carry several other rigs so that you are prepared for any fish that you might encounter. These will be discussed after reviewing the standard set up.
First, let’s talk about rod and reel selection. The Shimano Symetre Reel suggested above meets four major criteria: it has a dependable drag system, it is durable (high quality), it accommodates the line required for this type of fishing and it allows for long casts. The rod, a Diawa Medium Action, seven and a half foot rod, has both enough backbone to fight a twenty pound snook and to effectively cast for distance the baits required for Tampa Bay Fishing.
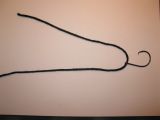
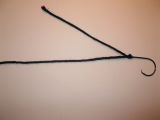
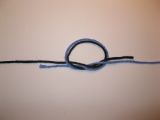
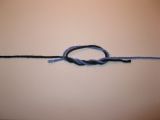
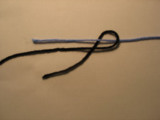
Now, let’s get rigged up. Begin by tying Ande Monofilament 20lbs test on to your reel with an Arbor Knot. This knot is useful for this application as it has a small diameter and doesn’t interfere with line coming off of the reel. Monofilament backing is required when using braided lines such as Power Pro as braided lines will spin on the reel spool if tied directly to it. Wind on 50 yards of Ande Monofilament line for backing. Use monofilamnet line that is five to ten pounds stronger than your main line. Connect your monofilament line to your 20 lbs Power Pro line by using a Modified Double Uni-Knot. To keep this knot small, use only three twists as opposed to the 5 or six normally used in tying a normal Uni-Knot. This minimizes interference from this knot when line is coming off of the spool during a cast. Power Pro braided line is my line of choice primarily for one reason…casting distance. Often times, my customers will be fishing in water less than three feet deep. When fish are in shallow water, they are much more nervous and may spook at the slightest noise or motion. By having the ability to make longer casts, the angler is better able to keep distance between him and the fish, decreasing the chance that fish will become disturbed and leave the area. Also, Power Pro’s sensitivity allows anglers to feel a fish as soon as it picks up the bait. When live bait fishing, we call this the “tick”…the actual point in time when the fish first eats the bait. It is critically important to feel this “tick” as fish sometimes eat the bait and drop back down in the water column without running. If the angler is unaware that the fish has eaten his bait, he may miss the opportunity to catch that fish. Also, if fishing around structure, not feeling this initial bite may allow a fish to swim around structure, such as a dock pole, so that when you come tight on the fish, you’re line immediately breaks. While spooling on your Power-Pro braided line, make sure that you have good resistance so that the line winds on firmly to minimize future opportunity for backlash.
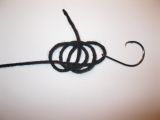
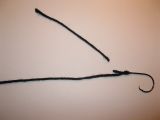
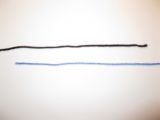
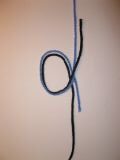
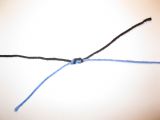
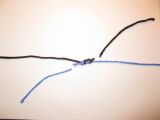
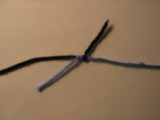
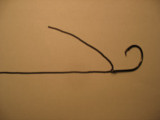
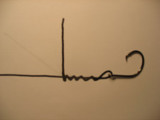
Once you have filled your reel with Power-Pro, use the Surgeon’s Knot to tie your Power-Pro to your Ande Flourocarbon leader. For snook fishing, especially in clear water, use a five to six foot fluorocarbon leader as these fish may be somewhat “line shy”. By using a longer than normal length of fluorocarbon leader, which is largely invisible to fish, you’ll overcome this problem. For other species, three and a half to four feet of leader is fine.
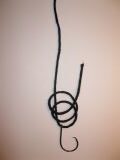
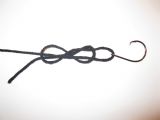
Complete your rigging by tying your Owner “Mutu Light” Circle Hook to your leader, using an Improved Clinch Knot. If you prefer a loop knot, as some anglers do to allow the bait more action, use the Non Slip Loop Knot. In this day and age of increased fishing pressure, all responsible anglers should use circle hooks when live bait fishing. In Florida, each angler can only keep a snook of 28 to 33 inches during five months of the year and one redfish between 18 and 27 inches, so chances are, you’ll be letting most of the fish you catch go. Use of a circle hook almost insures that any fish landed will go back into the water “hook free” and possessing no significant damage from its encounter.
The Mutu Light Style of Owner Hook is recommended as the lighter wire hook allows the bait to swim in an uninhibited fashion, especially important in snook fishing. Also, remember that hook size is determined largely by the size of your bait. As most Tampa Bay fishermen are typically using whitebait in the 3 to 5 inch size range, a #2/0 or #3/0 hook is adequate. However, if the bait on a given day is smaller (small whitebait) or larger (grass grunts, pinfish or ladyfish), you may want to use a #1/0 or #4/0 hook respectively.
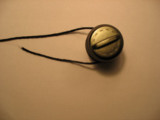
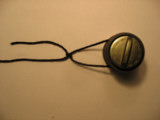
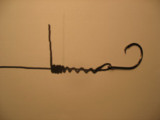
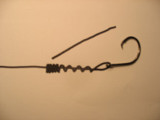
In certain situations when fishing live or dead bait, a Water Gremlin Removable Split Shot can be added to the above rigging. When fishing for snook in a swash channel or pass where the current is moving rapidly, a Water Gremlin split shot, size PSS2 to PSS4, can be secured a couple of feet above the hook. Add enough weight to bring your offering to the bottom but not so much that it significantly slows the drift of your bait as you want to maintain a “natural” drift. The other situation where a split shot should be added is when fishing for redfish near structure. A PSS2 size split shot should be placed less than an inch above the hook. This will not discourage a redfish from eating your bait and will drastically improve your casting accuracy and distance. Many Tampa Bay Fishing guides will fish residential docks and mangrove shorelines in search of redfish. When casting baits close in to structure, you do not want this bait to move for fear of becoming snagged on the structure. This added PSS2 split shot insures that your bait will stay where it is cast.
The tackle recommended above will cover about 80 percent of the fishing situations that you will encounter while flats or inshore fishing in the Tampa Bay Area.
Most Tampa Fishing Guides will also carry a couple of heavier rods on the outside chance that larger species such as kingfish, cobia, large jack crevalle, or sharks are encountered. Tackle suggested for these species is listed below.
-
Rod – 7 fOOT Daiwa CoastAL sPINNING rOD – #CC701-hFS
-
Reel – Shimano Spheros 6000FA Spinning Reel
-
Backing – Ande 30 lbs Monofilament Line
-
Line – Power Pro 30 lbs Braided Line
-
Leader – Ande 60 lbs Flourocarbon Leader
-
Leader – Malin 31lbs test Hard Wire Stainless Steel Leader
-
Hook – Owner #4/0 to #6/0 Circle Hook – #’s 5314-141 & 5174-161
The Daiwa Coastal Spinning Rod suggested above possesses the backbone to pressure a larger fish yet still has a flexible tip to support the longer casts that may be required. It also gives you the ability to throw larger baits more effectively. The Shimano Spheros 6000 Reel is a well constructed reel with a quality drag system but, unlike the smaller Shimano Symetre Reel mentioned above, has the ability to hold in excess of 300 yards of Power Pro 30 lbs test line, often required when fighting larger kingfish, smaller sharks and cobia. Start by securing your Ande Monofilament backing to your reel with an Arbor Knot. Wind on about 50 yards of monofilament line. Although you can choose to fill more of your spool with less expensive monofilament, you may be better served to put more braided line on your spool due to its thinner diameter. You’ll be thankful to have this extra line capacity when a large fish takes a long first run. Next, use the line to line Modified Double Uni-Knot to secure the monofilament to the braided line. With the larger diameter of the monofilament line used here, trim the tag ends as closely as possible and also make sure that when this knot goes on the spool, that it is positioned at the very bottom of the spool so as to minimize the interference of this knot with the line above it coming off of the reel. Next, spool on the 30 lbs test Power Pro line, again with good resistance so that the line winds on properly. Use the same Surgeon’s Knot when securing your leader to the line and then finish tying on the #4/0 to #6/0 Owner Circle Hook with an Improved Cinch Knot or a Palomar Knot, which is a better knot for leaders heavier than 40 lbs test and hook sizes of 6/0 and up. If a Tampa fishing guide feels he is likely to encounter king mackerel or sharks, a steel leader is typically tied on to one of these heavier rigs. Instead of tying the hook to the end of the fluorocarbon leader, tie the flourocarbon to the swivel on the pre-made steel leader with an Improved Clinch Knot. You can make your own leaders quite easily by purchasing wire leader material such as Malin Hard Wire Stainless Steel Leader. Like line, this leader material will have a pound test rating. 31 to 40 lbs. test is adequate for this rig. To make your leaders, cut a one foot section of wire. Tie a swivel, rated at least 40 lbs, to the end of the leader material using the Haywire Twist. Then, tie your hook to the other end of the leader material using the same knot and you’re done. If targeting sharks, you may want to have a much longer length of steel…approximately as long as the shark you are targeting.
In preparation for a typical inshore fishing charter, most Tampa Bay Fishing Guides will rig four to six of the seven and a half foot rods, and then might bring along two of the larger 8 foot rods, one rigged with a mono leader and the other rigged with steel. Although there are certainly times of year when there is little chance of needing the heavier equipment, it always good to have at least one larger rod available. One of the best things about saltwater fishing in the Tampa Bay Area is that you are never sure what fish might show up on a given day.